The Ultimate Guide to Microblading Aftercare: The Day-by-Day Healing Process and the Mistake that Ruins Your Brows
The day she almost rubbed her new brows off
Last Tuesday, at exactly nine in the morning, a woman walked into the Studio wearing massive, dark sunglasses. When she took them off, I could see her eyes were completely bloodshot and filled with tears.
She was gripping her purse so tight her knuckles were white. She whispered to me, almost voiceless: "Adriana, I’ve ruined the design. I ruined my face."
I gently had her sit down and turned on the magnifying lamp. The right side of her brow was slightly red, irritated, and a tiny piece of the healing scab was missing, leaving a light patch.
What had happened? She had rubbed her face aggressively with a cotton towel right after getting out of the shower. It was a pure morning reflex; she forgot she had new brows. The panic was real. She had invested her time and money in her look, in the freedom of waking up ready without makeup, and she thought she had thrown it all away in just three days.
Breathe. This happens much more often than you think.
If you are reading this, chances are you just got your eyebrows microbladed, shaded (Powder Brows), or you are about to book an appointment, and you are terrified of ruining the results. The first week of healing is a massive emotional and physical rollercoaster.
Today, I am giving you the unfiltered, detailed truth about how to care for your microblading day by day, what is completely normal to feel (so you don't panic), and the massive mistakes you must avoid at all costs.
Why is Aftercare So Important? (The Science of Healing)
Microblading and Micropigmentation aren’t magic marker pens; they are advanced facial design combined with millimeter-precise technique.
Like any procedure where we implant pigment into the upper layer of the dermis (your skin), we are creating tiny, controlled micro-wounds. Your skin reacts to these micro-wounds exactly the same way it reacts to a small scratch: it tries to heal itself.
The success of your beautiful new brows depends 50% on my skill as an artist, and 50% on how you take care of them at home while they heal. If you don't follow the rules, your body will push the pigment out, and you will be left with patchy, faded brows.
Let's break down exactly what your body will do over the next 30 days, so you can stop examining your face with a magnifying glass every five minutes.
The Microblading Healing Process: A Day-by-Day Timeline
Days 1 to 3: The "Angry Bird" Effect (Extreme Darkness)
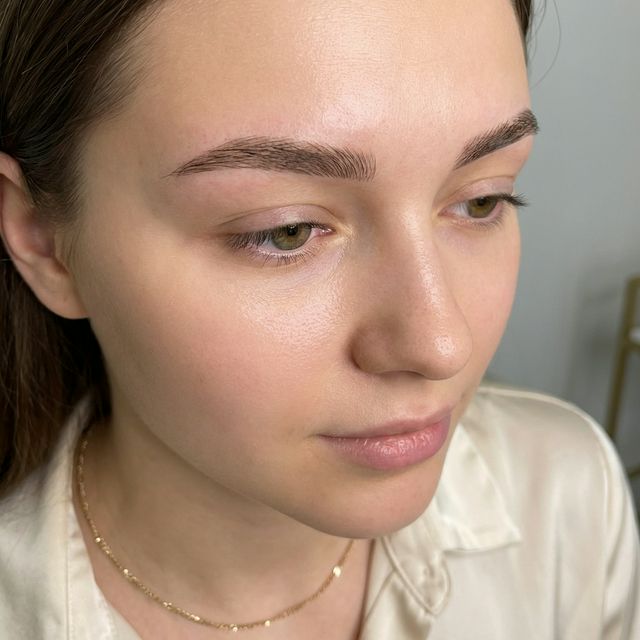
You will leave the studio feeling amazing. Your brows will look crisp, sharp, and perfect. But the next morning, you will wake up, look in the mirror, and probably think: "Oh my god, what have I done? They are way too dark and thick!"
Do not panic. This is completely normal.
Why does this happen? Two reasons:
- Oxidation: The pigment we implanted is coming into contact with the oxygen in the air and is naturally oxidizing (getting darker).
- Lymphatic Fluid: Your skin is secreting lymph (a clear healing fluid) and a tiny bit of blood. This mixture creates a microscopic film over the brow that makes it look up to 40% darker and thicker than the final result will be.
What NOT to do: Do not try to scrub them with soap or makeup remover to lighten the color. You will pull the pigment out. Just wait. The darkness is temporary.
Days 4 to 7: The Terror Phase (Flaking and Itching)
This is where the real psychological challenge begins. The upper layer of the skin starts to regenerate, and your brows will start to itch. A lot. It's the same itch you feel when a sunburn is healing.
You will also notice small, thin scabs or flakes forming and falling off in patches. Your brows will look patchy, uneven, and messy.
Here is mistake number one: Touching, scratching, or picking the flakes. Your skin is forming this protective film (scab) to lock the pigment inside the skin while it heals underneath. If you decide that a little flake looks ugly and you pick it off with your fingernail... you pick off the color with it. You will literally pull the pigment out of the dermis and leave a permanent empty, light spot in your design. Scabs MUST fall off naturally on their own.
Days 8 to 14: The "Ghosting" Phase (Where did my brows go?)
The scabs have finally fallen off, and suddenly... panic strikes again. The color seems to have completely disappeared. Your brows look extremely faint, almost as if you never got the treatment done. Many women call me during this phase crying, thinking their skin "rejected" all the pigment.
That’s not the case. Remember how the skin heals? A new, very thin, and opaque layer of baby skin has grown over the pigment to seal the area. Because this baby skin is milky and opaque, it temporarily hides the pigment underneath. Give it time.
Days 15 to 30: The Color Blooms (The Final Result)
As the weeks pass, your skin finishes its regeneration cycle. That opaque layer of baby skin fully heals, becomes translucent (like a clean window), and the color "blooms" back to the surface.
The color that returns will be soft, natural, and about 30% lighter than it was on Day 1. This is the true, final result. It’s the perfect time to evaluate the brows before your mandatory touch-up appointment.
The Perfect Cleaning Routine: How to Wash Your Brows
There is a lot of conflicting information online. Some artists say "dry heal" (don't wash them at all), others say wash them constantly. At AC Studio, we believe in clean healing. You don't need to live in a plastic bubble, but you do need to keep hygiene strictly in check to avoid infections.
Here is the exact routine you should follow:
- The First 24 Hours (The Crucial Wipe): During the first day, your brows will "weep" clear lymphatic fluid. If you let this fluid dry, it will form thick, heavy scabs that will pull the pigment out when they fall off. Every 2 hours, take a cotton pad slightly moistened with sterile bottled water and very gently wipe the brows to remove this fluid.
- Washing (Days 2 to 10): Wash your brows twice a day (morning and night) using an antibacterial, fragrance-free soap (like a gentle baby wash). Use your clean fingertips to lightly glide the soap over the brows in the direction of hair growth.
- Drying gently: Never rub them with a towel. Lightly press a clean paper towel or tissue over the brows to absorb the moisture.
- The Healing Ointment (Don't overdo it!): Once the brows are completely dry, apply a microscopic layer (the size of a grain of rice for both brows) of the specific healing ointment we provide you. It should form a thin, invisible film. If your brow shines like a mirror because you slathered it in Vaseline, you’ve used too much. Too much ointment suffocates the hair follicle and can cause an infection.
What is Absolutely FORBIDDEN the First 14 Days
If you want perfect retention, you must avoid these enemies at all costs:
- Extreme Sweat: No saunas, no high-intensity spinning, and no hot yoga. Sweat comes from inside the skin and pushes outward. Heavy sweating will literally push the fresh pigment right out of your pores, leaving your brows blurry. If you must work out, do light weightlifting or walking where your face does not sweat.
- Direct Shower Water: Do not stand facing the showerhead and let a hot stream of water blast your face. The pressure and heat will soften the scabs prematurely. Wash your hair leaning backward, or keep your face away from the water stream.
- Direct Sun and Tanning Beds: The sun devours pigment, especially when it's fresh and healing. Wear large sunglasses and a hat if you need to be outside. (Once fully healed, always apply SPF to your brows to prevent fading).
- Makeup in the Area: Do not use foundation, setting powder, brow pencil, or brow gel anywhere near the treated area until the scabs have completely fallen off. Your brow is essentially an open wound, and dirty makeup brushes will cause a severe bacterial infection.
- Sleeping on Your Face: Try to sleep on your back. If you bury your face in your pillow, the friction will rub the scabs off during the night.
The Happy Ending (And Why Choosing Your Artist Matters)
What happened to our panicked client on Tuesday morning?
I had her lie down on the bed and evaluated the damage under the magnifying lamp. Thankfully, she had only lifted the most superficial layer of the scab. Because we had implanted the pigment at the perfect depth, the color was mostly safe. I cleaned the area, applied a microscopic layer of soothing ointment, and calmed her down. A month later, she sent me a selfie from the beach. Zero makeup. Flawless brows.
Skin trauma during microblading depends entirely on the "hand" and skill of the professional. At Adriana Costa Studio, we use advanced nanoblading techniques and the highest precision, finest needles on the market.
This means we cut the skin only as much as absolutely necessary, reducing inflammation, preventing heavy bleeding, and consequently, making your scabs minimal and the healing process much smoother.
If you look for the cheapest option on the street, you will likely find someone who cuts too deep, creating actual scars and thick, painful scabs that heal into a gray, blurry mess. If you want flawless results that heal elegantly and safely, you are in the right place.
If you are in Barcelona or near Avenida Meridiana and are tired of fighting with your brow pencil every single morning, don't leave your face to chance.
Click here and book your expert Gaze Architecture diagnosis at AC Studio. Let's design the look that projects who you truly are, with the safest techniques in the industry.